Class 10: QGIS, bash variables, writing a bash script file, ipython+matplotlib
Table of Contents
Introduction
Today, we will get a brief view of Quantum GIS (QGIS), look at shell variables, create a "animated GIF" movie from the USCG Ice Breaker Healy's Aloftcon camera, and try out ipython with matplotlib.
Setup for today's class
You can do this one of 3 ways. You pick.
- Open a terminal and paste in the command
- Open a shell inside of emacs and paste in the command
mkdir -p ~/class/10
cd ~/class/10
wget http://vislab-ccom.unh.edu/~schwehr/rt/src/10-qgis-bash-python.org
Open the org file for lecture 10.
Creating today's work log entry org journalling
I will walk through creating an entry for today's research tools
class. Follow along. I have pre-written some of the entry so I don't
try to type it all in front of the class. You can include the text
from another file into the current location in a buffer by doing C-x i
Who edited their .bash_alias?
Did you watch all 4 YouTube videos? If you have not, you really need to watch them right away. Seriously!
Using QGIS to view a KML kml qgis
Copy the kml and xy files from the lecture 09 directory.
cp ../09/2007-boston-construction.kml .
cp ../09/2007-boston-construction.xy .
ls -l
If you do not have the lecture 09 results files, you can download them like this:
wget http://vislab-ccom.unh.edu/~schwehr/rt/examples/10/2007-boston-construction.kml.bz2
wget http://vislab-ccom.unh.edu/~schwehr/rt/examples/10/2007-boston-construction.xy.bz2
bunzip2 *.bz2
Start Quantum GIS (qgis):
Applications -> Science -> Quantum GIS
Once QGIS is running, do Layer->Add Vector Layer. Navigate to ~/class/10. On the bottom right of the file browser dialog box, there is an "[OGR]" file type selector. Pick "[OGR] KML" and then select 2007-boston-construction.kml.
You will now be looking at the path of a ship that worked on building an offshore natural gas terminal near Boston, MA.
Working with bash shell variables bash variables
We will be using variables in the bash shell a bunch today. A
variable has a name that is prefixed by a $. You set the variable
with "=".
There are some key tricks to understanding variables in bash. First, you must have no spaces before or after the equal sign. Bash is very picky about this. The other part is where your variable is available. Without the export, the variable is not available to other programs that are called from the command line. For us, right now, the export is not important, but later on for things like the PATH variable that control where to look for programs, export is essential.
To demonstrate variables, we will use the echo command which will just print out to the screen whatever we pass to it. Give it a try. The "$" character starts the use of a variable.
Open up a shell inside of emacs by doing:
- Split the window: C-x 2
- Start the shell: M-x shell
# Set a variable
testing=123

# Print the variable
echo $testing
# 123

# Start a new bash shell inside the original one
bash

# See that "testing" is not set.  If there is no variable, bash gives
# an empty string
echo $testing

# quit back to the main bash shell
exit

# Set testing to have a value that will be inherited
export testing="hello world"

bash

# Now see that the exported variable went through
echo $testing
# hello world
Creating a script
How can we use a variable to help out? What if we want to download one image every hour from one day on the USCGC Healy? Here is the 2011 set of images for the Healy:
Open emacs open a file in emacs called ~/class/10/healy.bash and start typing:
for hour in 01 02 03 04 05 06 07
do
  echo $hour
done
Try running the above with org-babel. Use C-c C-c inside of the
buffer. You should see a results table with 7 numbers.
Save that file and try running that from the terminal.
source healy.bash
You should see:
01
02
03
04
05
06
07
Now we can try to construct a curl command in the echo.
for hour in 01 02 03 04 05 06 07
do
  echo curl -O http://mgds.ldeo.columbia.edu/healy/reports/aloftcon/2011/20110928-${hour}01.jpeg
done
Try it and you should see the follow, but since we are using the echo command, nothing is actually being downloaded. This is just a test.
Do not forget to save your script! If you see "–:**-" on the bottom left of the window showing your script, that means you need to save.
curl -O http://mgds.ldeo.columbia.edu/healy/reports/aloftcon/2011/20110928-0101.jpeg
curl -O http://mgds.ldeo.columbia.edu/healy/reports/aloftcon/2011/20110928-0201.jpeg
curl -O http://mgds.ldeo.columbia.edu/healy/reports/aloftcon/2011/20110928-0301.jpeg
curl -O http://mgds.ldeo.columbia.edu/healy/reports/aloftcon/2011/20110928-0401.jpeg
curl -O http://mgds.ldeo.columbia.edu/healy/reports/aloftcon/2011/20110928-0501.jpeg
curl -O http://mgds.ldeo.columbia.edu/healy/reports/aloftcon/2011/20110928-0601.jpeg
curl -O http://mgds.ldeo.columbia.edu/healy/reports/aloftcon/2011/20110928-0701.jpeg
Remove the echo in that script and add hours 08 to 23.
Your script should now look like this:
for hour in 01 02 03 04 05 06 07 08 09 10 11 12 13 14 15 16 17 18 19 20 21 22 23
do
  curl -O http://mgds.ldeo.columbia.edu/healy/reports/aloftcon/2011/20110928-${hour}01.jpeg
done
Run it! You should now have all the images down. Time to make an "animated gif" using imagemagick/graphicsmagick.
convert -delay 100 -loop 0 *.jpeg healy-20110928-day-animation.gif

file healy-20110928-day-animation.gif
View that animated gif movie!!
firefox healy-20110928-day-animation.gif
You can now see that the Healy pulled into Dutch Harbor yesterday!
We can turn that script that we are running with source into a
proper script. Add this to the script at the first line:
#!/bin/bash
Now make the script "executable" with chmod. "Change mod" sets the permissions for a file and one of those permissions is "x" for executable. You can also put that convert command inside the script as the last line.
chmod +x healy.bash

./healy.bash
Introduction to python python
It is time to get away from doing so much of the shell and start writing python!
We will be using ipython version 0.10.2, which has documentation here:
Starting up ipython the first time ipython
The very first time you start up ipython, you will get a message about it setting up your account. You will only see this the first time. We will always start ipython with the "-pylab" option to setup matplotlib for making graphs.
In a terminal, run this. Make sure you are in ~/class/10 first (remember pwd and cd?).
ipython -pylab
You will see something similar to this:
**********************************************************************
Welcome to IPython. I will try to create a personal configuration directory
where you can customize many aspects of IPython's functionality in:

/home/researchtools/.ipython
Initializing from configuration: /usr/lib/python2.7/dist-packages/IPython/UserConfig

Successful installation!

Please read the sections 'Initial Configuration' and 'Quick Tips' in the
IPython manual (there are both HTML and PDF versions supplied with the
distribution) to make sure that your system environment is properly configured
to take advantage of IPython's features.

Important note: the configuration system has changed! The old system is
still in place, but its setting may be partly overridden by the settings in
"~/.ipython/ipy_user_conf.py" config file. Please take a look at the file
if some of the new settings bother you.
Press the return/enter key. And you will see ipython getting set up:
**********************************************************************
Python 2.7.1+ (r271:86832, Apr 11 2011, 18:05:24)
Type "copyright", "credits" or "license" for more information.

IPython 0.10.1 -- An enhanced Interactive Python.
?         -> Introduction and overview of IPython's features.
%quickref -> Quick reference.
help      -> Python's own help system.
object?   -> Details about 'object'. ?object also works, ?? prints more.

  Welcome to pylab, a matplotlib-based Python environment.
  For more information, type 'help(pylab)'.

In [1]:
The first thing to know how to do is to get out of ipython back to the shell.
In [1]: exit()
Do you really want to exit ([y]/n)? y
researchtools@ubuntu:~/class/10$
Now, if you start ipython, it will start up with less fuss.
Looking around with ipython ipython
Start ipython
ipython -pylab
ipython provides some features that are much like being in bash (these are not available in regular python).
In [1]: ls
10-qgis-bash-python.org       20110928-0801.jpeg  20110928-1801.jpeg
2007-boston-construction.kml  20110928-0901.jpeg  20110928-1901.jpeg
2007-boston-construction.xy   20110928-1001.jpeg  20110928-2001.jpeg
20110928-0101.jpeg            20110928-1101.jpeg  20110928-2101.jpeg
20110928-0201.jpeg            20110928-1201.jpeg  20110928-2201.jpeg
20110928-0301.jpeg            20110928-1301.jpeg  20110928-2301.jpeg
20110928-0401.jpeg            20110928-1401.jpeg  healy-20110928-day-animation.gif
20110928-0501.jpeg            20110928-1501.jpeg  healy.bash
20110928-0601.jpeg            20110928-1601.jpeg  healy.bash~
20110928-0701.jpeg            20110928-1701.jpeg

In [2]: pwd
Out[2]: '/home/researchtools/class/10'
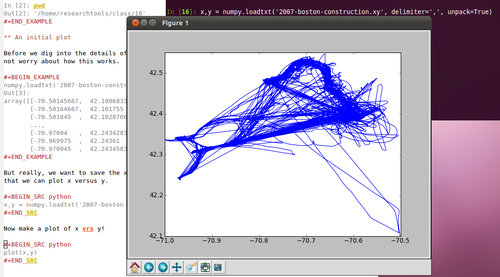
An initial plot
Before we dig into the details of python, let's make a quick plot. Do not worry about how this works. We will cover all of this later.
numpy.loadtxt('2007-boston-construction.xy', delimiter=',')
Out[3]:
array([[-70.50145667,  42.10068333],
       [-70.50164667,  42.101755  ],
       [-70.501845  ,  42.10287667],
       ...,
       [-70.97004   ,  42.24342833],
       [-70.969975  ,  42.24361   ],
       [-70.970045  ,  42.24345833]])
But really, we want to save the x and y into their own variables so that we can plot x versus y.
x,y = numpy.loadtxt('2007-boston-construction.xy', delimiter=',', unpack=True)
Now make a plot of x vrs y!
plot(x,y)
Updating Ubuntu sysadmin
NOTE: please do this at the end of class before you leave.
It is a good idea to keep your computer up-to-date with patches. The same goes with your Ubuntu virtual machine. Open a normal terminal and run these commands one at a time. Remember that the researchtools account password is "!rt2011vm".
sudo apt-get update
sudo apt-get upgrade
The output should look something like this:
researchtools@ubuntu:~$ sudo apt-get update
[sudo] password for researchtools:
Ign http://dl.google.com stable InRelease
Ign http://linux.dropbox.com natty InRelease
Get:1 http://dl.google.com stable Release.gpg [198 B]
Ign http://extras.ubuntu.com natty InRelease
Ign http://security.ubuntu.com natty-security InRelease
...
Ign http://us.archive.ubuntu.com natty-updates/restricted Translation-en
Ign http://us.archive.ubuntu.com natty-updates/universe Translation-en_US
Ign http://us.archive.ubuntu.com natty-updates/universe Translation-en
Fetched 944 kB in 2s (317 kB/s)
Reading package lists... Done

researchtools@ubuntu:~$ sudo apt-get upgrade
Reading package lists... Done
Building dependency tree
Reading state information... Done
The following packages will be upgraded:
  apport apport-gtk apt apt-transport-https apt-utils libgksu2-0 libqt4-dbus libqt4-declarative
  libqt4-designer libqt4-help libqt4-network libqt4-opengl libqt4-script libqt4-scripttools
  libqt4-sql libqt4-sql-mysql libqt4-svg libqt4-test libqt4-xml libqt4-xmlpatterns libqtcore4
  libqtgui4 linux-headers-2.6.38-11 linux-headers-2.6.38-11-generic
  linux-image-2.6.38-11-generic linux-libc-dev nvidia-common python-apport python-problem-report
  tomboy tzdata
31 upgraded, 0 newly installed, 0 to remove and 0 not upgraded.
Need to get 66.2 MB of archives.
After this operation, 49.2 kB disk space will be freed.
Do you want to continue [Y/n]?
Get:1 http://us.archive.ubuntu.com/ubuntu/ natty-updates/main linux-image-2.6.38-11-generic i386 2.6.38-11.50 [35.8 MB]
Get:2 http://us.archive.ubuntu.com/ubuntu/ natty-updates/main nvidia-common i386 0.2.30.1 [11.2 kB]
...
Processing triggers for python-central ...
Setting up python-apport (1.20.1-0ubuntu5.1) ...
Processing triggers for python-central ...
Setting up apport (1.20.1-0ubuntu5.1) ...
start: Job failed to start
invoke-rc.d: initscript apport, action "start" failed.
Processing triggers for python-central ...
Setting up apport-gtk (1.20.1-0ubuntu5.1) ...
Processing triggers for libc-bin ...
ldconfig deferred processing now taking place
researchtools@ubuntu:~$
It is important to reboot the virtual machine after doing an update. It is not strictly required and most updates do not need the Ubuntu virtual machine to reboot, but it is a good habit.
sudo reboot
If the date of your virtual machine is way off ntp time
If the date of your virtual machine is way off from when "now" really is, use this command to jump the sense of time to get in sync with now. The "wilmot" computer is the UNH time server.
sudo ntpdate ntp.ubuntu.com
The output should look something like this, but with much bigger jumps.
29 Sep 06:14:35 ntpdate[9861]: adjust time server 91.189.94.4 offset 0.045046 sec
NOTE: "NTP" stands for network time protocol. See: http://ntp.org or NTP on Wikipedia.
Date: <2011-09-29 Thu>
HTML generated by org-mode 7.4 in emacs 23