 |
A Tour of GeoZui3D Menus

|
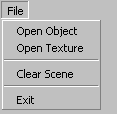
The menu is the only place where files can be loaded and
options can be changed. The following figure gives an overview
of what is available on the menu bar.
File Menu
The File Menu allows you to load files, clear the
scene, and exit GeoZui3D.
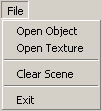 |
| Open Object |
Opens a popup file browser that allows you to choose
an object file to open. The file browser allows you
to filter files based on object type. Once an object
is chosen, it is loaded into the scene and added to
the Object Panel.
|
| Open Texture |
Opens a popup file browser that allows you to choose
a texture or color lookup table (clut). The file
browser allows you to filter files based on texture
type. Once a texture (or clut) is chosen, it is
loaded into the list of textures on the Object Panel.
|
| Clear Scene |
Removes all objects from GeoZui3D and resets the
main view. The object list in the Object Panel is
emptied, but all textures remain intact.
|
| Exit |
Exits GeoZui3D without asking any questions.
|
|
View Menu
The View Menu allows you to change global view settings
such as stereo and background color, and provides access
to the Object Panel.
 |
| Stereo |
Toggles stereo mode. When the Stereo menu item is
checked, GeoZui3D renders each 3D image for two
eyes (see Stereo
Viewing for more details). When the Stereo
menu item is not checked, each 3D image is
rendered for a single viewpoint.
|
| Side by side stereo |
See Stereo Viewing
for details about this item.
|
| Objects |
Brings up the Object Panel, if it is not already open.
See A Tour of the Object Panel
for details about the Object Panel.
|
| Background |
Opens a popup color editor that allows for selection
of a new background color. Once a color is selected,
all 3D windows are updated with the new background
color.
|
|
Options Menu
The Options Menu allows you to control global interaction
settings. These settings apply to interactors such as
the widgets, the one-eyed cursor, and the middle-button zoom.
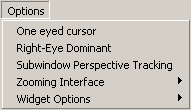 |
| One Eyed Cursor |
Toggles whether or not the cursor is rendered by
GeoZui3D a single eye, or is left to the operating
system to render normally. When viewing in stereo,
it easier to understand where the mouse is pointing
when it is only rendered for one eye. When left
to the operating system, the cursor appears to be
in different places, depending on the eye. When
this item is checked, the one-eyed cursor is active.
When this item is unchecked, the system cursor is
restored.
|
| Right Eye Dominant |
Determines which eye the one-eyed cursor is rendered
in. When checked, the one-eyed cursor is rendered
in for the right eye. When unchecked, the one-eyed
cursor is rendered for the left eye.
|
| Subwindow Perspective Tracking |
Determines the center of projection for all 3D windows.
When checked, the center of projection is assumed to
be shared by all 3D windows, at a point along the line
perpendicular to the center of the main 3D window.
When unchecked, each 3D window has its own center of
projection at a point along the line perpendicular to
its own window center.
|
| Zooming Interface |
This submenu determines how the middle button navigation
interface behaves. See
Zooming Interface Submenu below.
|
| Widget Options |
This submenu determines which center-of-workspace widgets
appear in each 3D window. See
Widget Options Submenu below.
|
|
Zooming Interface Submenu
The Zooming Interface Submenu determines how the
middle button navigation inteface behaves. Each
item in this menu is mutually exclusive with
the others (like radio buttons).
 |
| Use "Shift" Key to Zoom Out |
When this menu item is checked, pressing the middle
mouse button by itself always begins a zoom-in.
Zooming out occurs when both the middle mouse
button and the "Shift" key are depressed.
|
Throttle Zoom
(Default setting) |
When this menu item is checked, pressing the middle
mouse button without moving the mouse only
begins a translation of the selected surface to
the center of the workspace. No zooming occurs
until the mouse is pushed forward or backward
(with the middle button depressed). While the
middle button is down, moving the mouse forward
causes the scene to zoom in; moving the mouse
backward causes the scene to zoom out. Once
a direction is picked, the horizontal line
about the center of the screen becomes the
switch-over point between zooming in and zooming
out. The metaphor here is one of a throttle
control on an airplane or submarine, although
the zoom rate does not increase or decrease
according to how much the mouse moves forward
or backward.
|
| Reverse Throttle Zoom |
This item works like the throttle zoom, but in
reverse; the metaphor is more one of "pulling"
the scene toward you to zoom in and "pushing"
it away from you to zoom out. When this menu is
checked, pressing the middle
mouse button without moving the mouse only
begins a translation of the selected surface to
the center of the workspace. No zooming occurs
until the mouse is pushed forward or backward
(with the middle button depressed). While the
middle button is down, moving the mouse forward
causes the scene to zoom out; moving the mouse
backward causes the scene to zoom in. Once
a direction is picked, the horizontal line
about the center of the screen becomes the
switch-over point between zooming in and zooming
out.
|
|
Widget Options Submenu
The Widget Options Submenu determines which center-of-workspace
widgets appear in each 3D window. Multiple items in the menu
can be selected at once, and are independent of each other.
 |
| Compass |
When this menu item is checked, a North-pointing
compass appears within the circle at the top of
the center of workspace widgets. When this item
is unchecked, the compass does not appear. This
item is checked by default.
|
| Horizontal Scale |
When this menu item is checked, a dynamic scale
appears along the horizontal axis of the widgets.
The scale indicates distance from the center of
workspace. Scale markings can be clicked and
dragged to make fine-grained changes in scale.
When this menu item is unchecked, the horizontal
scale does not appear, nor can it be used to
affect scale.
|
| Vertical Scale |
When this menu item is checked, a dynamic scale
appears along the vertical axis of the widgets.
The scale indicates distance from the center of
workspace. Scale markings can be clicked and
dragged to make fine-grained changes in
height exaggeration. When this menu item is
unchecked, the vertical scale does not appear,
nor can it be used to affect height exaggeration.
|
| Lighting Control |
When this menu item is checked, the lighting control
appears up and to the right of the widgets. This
control is used to interactively specify the lighting
direction. The lighter ball indicates the light source,
while the darker ball indicates the effect this light
source has on an object in the scene. Any part of the
control can be clicked and dragged with the first mouse
button, causing the lighter ball to follow in the direction
of mouse motion. The motion of the lighter ball is confined
to a hemisphere with its base parallel to the screen. Since
the lighting control is effected by the rotation widgets,
lighting can be made to come from any direction, including from
underneath. If you cannot achieve the lighting angle you
are looking for, rotate the scene using the rotation widgets.
When this menu item is unchecked, the lighting control
does not appear.
|
| Shallow Angle Compensation |
When this menu item is checked, the portion of
the widgets attached to the circle on top avoid
displaying directly from the side. This makes
it easier to use the compass and azimuth/heading
rotation widgets at shallow settings of
elevation/pitch. One drawback to using this option
is a skewed sense of what is parallel to the
ground plane (or to the plane at sea level). When
this item is unchecked, the widgets attached to the
circle on top retain a constant orientation with
respect to the scene.
|
|
Tools Menu
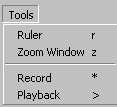
The Tools Menu changes the current interaction state, for
purposes such as placing a ruler post, creating a new
subwindow, or recording scripts and playing them back.
Hotkeys are displayed to the right of each menu item,
indicating what key can be used to invoke the same
tool without use of the menu. All of the modes explained
here can be exited by pressing the escape key at any time.
 |
| Ruler |
Puts your cursor into ruler-placement mode. The
next time the left mouse button is clicked, a
ruler post will be placed at the surface directly
under the cursor. If no surface is present, no
post is placed, and rule-placement mode is exited.
|
| Zoom Window |
Puts your cursor into zoomport-creation mode. The
next time the left mouse button is clicked, a
zoomport will be created with its center of
workspace located at the point on the surface
directly under the cursor. If no surface is
present, no zoomport is created, and
zoomport-creation mode is exited.
|
| Record |
Begins recording actions to a script for later
playback. Many, but not all actions are recorded.
Scripts recorded on one machine may not function
the same way on another machine (due to differences
between OpenGL implementations on the graphics cards).
The script is recorded to the file "test.tcl".
|
| Playback |
Begins playback of actions earlier recorded by the
Record menu item. Plays back only from a file
named "demo.tcl" (so to playback a script you
just recorded, rename it from "test.tcl" to "demo.tcl").
See the Record menu item above for caveats on
recorded scripts.
|
|
Commands Menu
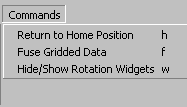
The Commands Menu provides access to some miscellaneous
commands. Hotkeys are displayed to the right of each
menu item, indicating what key can be used to invoke the
same command without use of the menu.
 |
| Return to Home Position |
Returns the current 3D window to its "home"
position. For the main window, this is the
position it was in when GeoZui3D first started.
For zoomports, this is the position it was in
when it was created.
|
| Fuse Gridded Data |
Causes higher-resolution Gutm objects to cut holes
in lower-resolution Gutm objects that overlap them.
Currently, this operation cannot be undone, and
the results of the operation are never saved to a file.
|
| Hide/Show Rotation Widgets |
If the center-of-workspace widgets are present,
hide them in all windows. If they are hidden,
restore them in all windows.
|
|
Help Menu
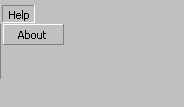
The Help Menu currently only provides access to the About box.
 |
| About |
Opens the About box, with version information, contact
information, and copyright information.
|
|


