 |
A Tour of the GeoZui3D Object Panel
|
|
|
The Object Panel gives you information about loaded objects,
and gives you control over how these objects are viewed. It
also provides access to textures for the purposes of assigning
them to objects, and editing color lookup tables.
|
|
The Object Panel is divided into 4 frames, with a button for
closing the panel found below these frames. The first frame is
the Objects Frame, which lists the
objects currently loaded in the scene. The buttons in this
frame allow you to hide and show objects, save changes to
objects or save the scene, ask for information about an object,
or unload an object from the scene.
|
| The second frame is the
Textures Frame, which lists the
textures (and color lookup tables, or cluts) currently loaded.
The buttons in this frame allow you to assign textures to
objects, and edit and save cluts. See
A Tour of the GeoZui3D Clut Editor
for details about editing color lookup tables.
|
| The third
frame is the Information Frame,
which provides information about a given object, and also
displays the location and orientation information for the
main window.
|
| Finally, the fourth frame is the
Height Exaggeration Frame,
which displays the current height exaggeration, and allows
you to test and select new height exaggerations. Height
exaggeration can also be set interactively by enabling
the Vertical Scale on the widgets through the
Options-->Widget Options submenu
|
| The "Close Frame" button simply closes the Object Panel,
restoring the main 3D window to the full width of
GeoZui3D.
|
Objects Frame
The Objects Frame lists the
objects currently loaded in the scene. The buttons in this
frame allow you to hide and show objects, save changes to
objects or save the scene, ask for information about an object,
or unload an object from the scene.
 |
| Object Listing |
The list at the top of the Objects Frame is called the
Object Listing. It lists all objects currently loaded
into the scene using the name that the object can be
referenced by in the scripting language. The list is
scrollable in both directions. The selected item or
items in this list become the operands of operations
invoked by buttons throughout the Object Panel.
|
| Save Button |
Allows you to save the object(s) selected in the Object
Listing. If no filename exists for the object, one
is automatically generated based on its type. Only
objects that support editing can be saved.
|
| Hide Button |
Hides the object(s) selected in the Object Listing,
so that they are no longer rendered in any of the
3D windows.
|
| Show Button |
Unhides the object(s) selected in the Object Listing,
so that they are rendered in all 3D windows (assuming
they are not clipped at the time).
|
| Info Button |
Lists information in the
Information Listing about the object(s) selected
in the Object Listing.
|
 (Delete) Button (Delete) Button |
Unloads the object(s) selected in the Object Listing
from the scene, thereby removing it from the Object
Listing. No further operations are possible on this
object unless it is loaded again.
|
| Save Scene Button |
Opens a popup file browser that allows you to choose
the path for the scene file you wish to save. Once
selected, GeoZui3D generates a scene file containing
all of the currently loaded objects (regardless
of what is selected in the Object Listing).
|
|
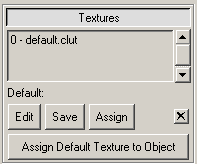
Textures Frame
The Textures Frame lists the
textures (and color lookup tables, or cluts) currently loaded.
The buttons in this frame allow you to assign textures to
objects, and edit and save cluts.
 |
| Texture Listing |
The list at the top of the Textures Frame is called the
Texture Listing. It lists all textures currently loaded
into the scene. The list is scrollable in both directions.
The selected item in this list becomes the operands of
operations invoked by the buttons in the Texture Frame.
Double-clicking on a texture in the Texture Listing
causes it to become the default texture (see description
immediately below).
|
| "Default:" Indicator |
Displays the name of the texture currently being used
as the default texture. The default texture is applied
to all objects that have not been otherwise assigned
a texture. To change the default texture to a new
texture, double-click on the desired texture in the
Textures Listing.
|
| Edit Button |
If the currently selected texture is a clut, pressing
this button opens the
Clut Editor, allowing
you to edit the clut. See
A Tour of the GeoZui3D Clut Editor
for details about editing color lookup tables.
|
| Save Button |
Opens a popup file browser that allows you to choose
a path for saving the clut selected in the Texture
Listing. Once a file path is chosen, GeoZui3D saves
the selected clut.
|
| Assign Button |
Assigns the texture selected in the Texture Listing
to the object(s) selected in the Object Listing. This
assignment overrides any default or existing assignments
of textures to these objects. How the texture is applied
depends on the object. For instance, a clut assigned
to a Gutm object will appear as a color-coding for
height, while a clut assigned to a DataPoints object
will be used as a look-up table for the values at
each of the points.
|
| (Delete) Button |
Unloads the texture selected in the Texture Listing,
thereby removing it from the Texture Listing. No
further operations are possible on this texture
unless it is loaded again.
|
| "Assign Default Texture to Object" Button |
Overrides any existing assignment on the object(s)
selected in the Object Listing, and assigns the
default texture to these objects.
|
|
Information Frame
The Information Frame provides information about a given
object, and also displays the location and orientation
information for the main window.
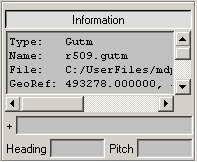 |
| Information Listing |
The list at the top of the Information Frame is called the
Information Listing. It lists information about objects
selected in one of two ways: either by pressing the
Info Button in the Objects Frame, or by clicking on an
object in a 3D window. The list is scrollable in both
directions.
|
| "+" (Position) Indicator |
Displays the current location of the center of workspace
for the main 3D window, given in UTM coordinates and
distance from sea-level (meters).
|
| Heading Indicator |
Displays the current heading (azimuth) for
the main 3D window, given in degrees off north.
|
| Pitch Indicator |
Displays the current pitch (reverse elevation) for
the main 3D window, given in degrees off the
horizontal. +90 degrees corresponds to looking
straight down.
|
|
Height Exaggeration Frame
The Height Exaggeration Frame displays the current
height exaggeration, and allows you to test and select
new height exaggerations. Height exaggeration can also
be set interactively by enabling the Vertical Scale on
the widgets through the
Options-->Widget Options submenu
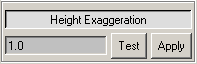 |
| Height Exaggeration Indicator |
Displays the current height exaggeration in effect, and
allows the text entry of a new height exaggeration. A newly
entered height exaggeration does not go into effect until
either the "Enter" key is pressed, or one of the two buttons
in this frame is pressed. Using the "Enter" key is equivalent
to pressing the Apply Button.
|
| Test Button |
Tests the height exaggeration entered in the Height Exaggeration
Indicator. This testing is done by putting the new height
exaggeration into effect without recalculating the lighting.
This is always a fast operation, whereas using the
Apply Button may take significantly longer with large
data sets.
|
| Apply Button |
Applys the height exaggeration entered in the Height exaggeration
Indicator and recalculates the lighting. For large data sets,
this operation can take a while. If it is not known how much
height exaggeration is required, it may be best to test the
current exaggeration first, using the Test Button.
|
|